What you'll learn
- 🎨 Master the art of crafting stunning 3D cake masterpieces from scratch.
- 🏗️ Learn strategic planning and construction techniques for impressive 3D cakes.
- 📜 Discover the best recipes tailored for creating stand-out 3D cakes.
- 🔪 Perfect your skills in shaping, carving, and assembling intricate 3D cakes.
- 🎨 Enhance your cake's appearance using expert airbrush coloring techniques.
- 🐘 Achieve realistic elephant-like textures to elevate your cake designs.
- 🧩 Explore materials and methods for crafting gravity-defying cake elements.
- 🍰 Serve your 3D cakes without sacrificing delicious taste for dazzling design.
- 📚 Gain valuable tips and insights to advance your cake artistry skills.
- 🔄 Easily apply your newfound skills to create any 3D cake you envision.
Course Content
Before We Begin - Watch This!
1 lectureWatch this lesson to get a brief intro to the Udemy Video Player. It'll help you to quickly learn the player's most critical features so you can enjoy this course the most.
Getting started: Overview, Planning and Construction
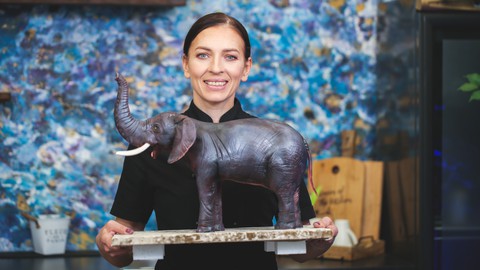
4 lectures»3D Elephant Cake – learn how YOU can make a masterpiece« is a very broad course that guides you through all the secrets of making amazing 3D cakes focusing on a realistic elephant standing on all four feet. In this introductory lecture, Eva presents an overview of the course, including all the recipes, tools & materials and skills that it covers. She also details other topics covered by the course, such as serving this kind of cakes without having to compromise the taste for the 3D design.
For a great result, it's essential to take a bit of time to plan your project. Specifically, you need to make some important decisions before you start making your elephant cake.
In this lesson, Eva explains the importance of a plan –a drawing of the cake. There are two ways to approach this drawing, one is if you are comfortable with freehand drawing and the other one if you are not comfortable with freehand drawing. Eva has a solution for both approaches.
From a good and precise plan, you can decide where and how to put an internal construction and what size of a cake board you need.
You can also make templates that you are going to need for carving the cake in the right shape.
From the plan, you can also measure all the sizes of the internal construction and make templates for additional cake boards that will hold the cake. Eva takes you through the process of planning the construction and explains what kind of materials to use.
For a 3D cake that needs internal construction, it's best if you make your cake board. It has to be strong enough to carry all the weight and allow to drill holes into it.
In this lesson, Eva demonstrates what kind of material to use for a cake board and how to cover it with fabric to make a beautiful and presentable foundation for your masterpiece.
Let's start making a masterpiece
5 lecturesIn this lesson Eva introduces all the tools and material you will need for carving and assembling this 3D elephant cake
We don't want any metal parts touching the cake, so in this lesson, you will learn how to make everything food safe. Simple and easy.
In this lesson, Eva demonstrates how to cut the cake using the templates and how to assemble the cake into a basic shape of an elephant. You'll discover how to avoid the crumbling of the cake, how to make cake paste and how to use it. You will learn some useful tips and trick on how to achieve the shape that you are looking for.
To make a 3D cake firmer and prevent it to become too soft when exposed to a room temperature or warm environment, it's a good idea to give it a crust coat with melted chocolate.
In this lesson you will learn a simple method of applying a thin layer of melted chocolate, to give your cake more stability so you can rest assured your cake will stay stable in any environment.
After a layer of chocolate, you have to apply another layer of ganache. The reason we do that is to smooth the surface. The ganache layer also provides a base for the fondant to stick on the cake.
In this part of the course, you'll learn about the right consistency of ganache when masking the cake, how to mask a cake that has an irregular shape and how to achieve a smooth surface. This smoothness is fundamental for a good result.
Adding the sugar paste
7 lecturesIn this quick introduction, Eva explains what you will need for building all the different elephant parts that are still missing, like the trunk, tusks, tail, tummy part and legs.
If there are parts of the cake that need to harden or dry before you can attach them to the cake, you can use your plan to decide what is the shape of that part and what kind of materials to use. That will determine when to make it for it to dry and harden. In this lesson, Eva teaches you how to make the elephant's tusks and which edible material to use.
In this lesson, Eva demonstrates the whole process of making the elephant's legs, feet and tummy part. You will learn how to use modelling chocolate and some great tips on how to smoothen it. You will also learn how to use the tools for shaping to create realistically looking elephant legs and tummy.
Elephant skin can be done with different sugar paste. Because all paste has different characteristics, it is best to give it a little thought and choose the paste that fits your goals and needs best.
In this lesson, Eva takes you through the process of covering the cake with sugar paste. You will learn how to plan this part of making a 3D cake and how to successfully apply the paste to the cake and give it a certain look.
There are a lot of practical, demonstrative tips in this lesson, like how to roll a sugar paste, how to avoid air bubbles, how to avoid the paste getting dry too quickly, how to apply the paste to the cake and how to make joining parts invisible or even use the seams to achieve a certain look. You will also learn how to texturize the surface so that at the end of this lesson you will be able to achieve a realistic elephant skin look.
The trunk is quite a big part of the elephant. It's attached to his head and as planned; we want the trunk to be sticking out of the head and pointing upwards. It is a little gravity challenge. A trunk made of any sugar paste alone could be too heavy to defy gravity.
In this lesson, Eva shows you how to solve the trunk gravity challenge. You will learn what materials to use and how to assemble everything together. You will also learn how to attach the trunk to the head and how to achieve unified look with the rest of the elephant's body. Last but not least you will be shown how to shape the face and the eyes.
An elephant has large and quite thin ears sticking out of his body, so like the trunk, they need some internal support.
Therefore this is where you will learn to create an elephant's ears and how to attach them to his body. Eva teaches you how to make internal support for the elephant's ears, which materials to use so you don't have to wait until they harden and how to achieve a realistic look.
The last part of the elephant to make is his tail.
In this lesson, Eva demonstrates how to make a tail using a thin wire and how to attach it to the elephant's body.
With the tail attached, all the body parts are finished, so you can move on to colouring the elephant.
Colouring the elephant
3 lecturesThis lesson starts with a quick introduction to how to colour the elephant. Eva explains what kind of colours you need and what is the best choice for an airbrush gun. Then comes the fun part where Eva demonstrates how to apply colours using an airbrush technique to achieve a realistic elephant skin.
In this lesson, you will learn a lot of helpful tips and advice on how to use an airbrush and how to choose and use the right colours that will help you grow your skills as a cake artist.
o finish this elephant cake, you need to add some final pieces, like the eyeballs and tusks.
In this lesson, Eva demonstrates how to complete elephants’ eyes by adding a small piece of sugar paste and how to attach the tusks to the head. At the end of this lesson, she will show you how to colour the eyeballs to complete this masterpiece.
This is an additional lesson that will be helpful if you don't have an airbrush and you want to learn about alternatives for colouring. Eva demonstrates which colours to use and how to apply them without an airbrush.
Revealing of the cake
3 lecturesIn this lesson, Eva talks about some important troubleshooting that can occur when colouring. Some colours can change their shade after a while. The teacher learns the most, they say. And not to leave you without the solution, Eva also has some advice on how you can solve and avoid this problem.
Before Eva cuts into the cake, she removes the protection cellophane sheet to reveal the final masterpiece.
Before saying goodbye, Eva takes a moment to review and summarize what you've learned and accomplished in this course.
First and foremost, you learned the importance of the right recipes you use when making 3D cakes. You learned how to draw a plan and make templates that you can trust. You learned how to build a construction, a cake board, how to carve, shape and mask the cake. You mastered covering the cake with sugar paste and making different parts of the elephant.
At the end of this course, you have all the knowledge on how to make an elephant 3D cake, that you can now bring to practice. And practice makes perfect. Believe in yourself and grow your craft.
This is an additional lesson where Eva demonstrates how she serves her mud cakes to elevate their rich chocolaty taste. That is how you never have to compromise the taste for the 3D design.
Course Materials
3 lecturesDescription
🎂 Do you think you need to be an experienced pastry chef to create breathtaking 3D cakes? Or perhaps you feel only a few have the innate talent to craft masterpieces? 👉 In this course, learn how YOU can make show-stopping creations, proving these myths untrue!
Follow the step-by-step expert guidance of cake artist Eva Klinc and transform into a proficient 3D cake artist. 🎨 Leverage Eva's extensive experience in cake decoration to uncover the essential secrets for standing out in the baking world and becoming So Good Nobody Can Ignore You.
🤯 Master the essential techniques for crafting a lifelike 3D elephant cake
🔍 Unlock the secrets of carving, masking, and assembling 3D cakes
🗂️ Learn how to create precise plans for templates and construction
🎨 Discover how to use airbrushing for cake coloring
🦣 Craft realistic elephant skin and gravity-defying body structures
🔄 Apply your newly-acquired knowledge to any other 3D cake you wish
🏆 After completing this course, you'll edge closer to becoming a master cake artist. Explore a treasure trove of invaluable techniques and practical advice, empowering you to craft true masterpieces that will stand out in the bustling online world of cakes. Remember, the goal is to Become So Good They Can't Ignore You!
Who this course is for:
- 👩🍳 Bakers and cake artists aiming to push their creative boundaries
- ✨ Advanced bakers wanting to craft show-stopping 3D cakes
- 🎓 Those committed to becoming master cake artists with basic baking skills
- 🏪 Bakery and pastry shop owners keen on making and selling 3D cakes
- 🏅 Professional and semi-professional cake artists eyeing competitions
- 🚀 Cake makers aspiring to elevate their brand
- 🎭 Artists curious about transforming their art into an edible medium
Course Reviews
-
😀 Gleber Tacio Teixeira
-
😀 Aastha Thawani
-
😀 Sindhupandi Mathivanan
Great course Mam, thank you so much, I had completed elephant cake. I feel happy. Now I am learning Sculpting from you... Waiting for your new courses from you Mam. Thanks and Regards Sindhupandi Mathivanan.

