Ingredients
Materials Needed
Instructions
Step 1
Start by setting up a clean, spacious work area where you can comfortably create your mushroom decorations. Gather all materials and tools you will need.
Make sure to cover your working surface with newspaper or a plastic sheet to catch any paint spills.
Step 2
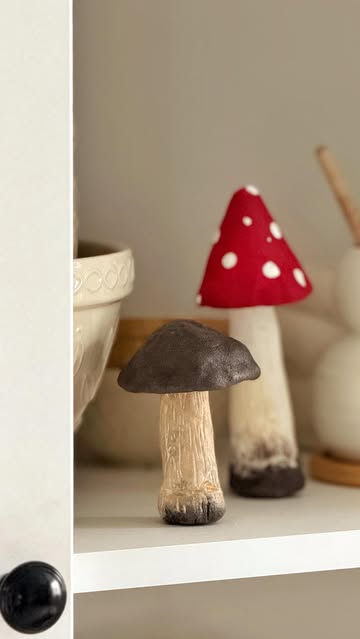
Using the air-drying clay, form the mushroom caps and stems. Mold each piece to your desired size, keeping the caps a bit larger than the stems.
Once shaped, let the mushrooms dry completely as per the instructions on the clay packaging, which usually takes about 24 hours.
Step 3
Once the clay is dry, take the white semi-matte spray paint and apply it evenly on the mushroom caps. This will serve as a base coat.
After the white paint has dried, use acrylic paints to add colorful details using a sponge or brush to enhance the natural look of mushrooms.
Step 4
Using a glue gun, carefully attach the mushroom caps to their respective stems. Ensure a secure bond to prevent them from falling apart.
Allow the glue to cool completely before handling your finished mushrooms further.
Step 5
Once everything is dry and secured, find a lovely spot in your home to display your adorable DIY mushrooms. They make a charming addition to your fall decor!
Enjoy your creative project and let the cozy vibes of fall surround you with these cute decorations.
Servings
Whether you're decorating for a cozy gathering or just sprucing up your living space, these mushrooms are versatile enough to fit any setting. Consider grouping a few together on a decorative tray to create a charming centerpiece for your dining table.
For an extra festive touch, you can even use them as unique placeholders for your fall dinner parties. Guests will be impressed by your creativity! 🍽️
Equipment
This is the star material for your mushroom crafts. It feels soft and is easy to mold, making it perfect for beginners. Remember to keep it in an airtight container to prevent it from drying out.
A small, sharp knife is essential for adding the details to your mushrooms. Work carefully and make sure to supervise any young crafters using sharp tools.
This will give your mushrooms a beautiful finish. Be sure to spray in a well-ventilated area and use a mask to avoid inhaling fumes.
Acrylics are versatile and dry quickly. Use a sponge for a softer application and create texture on your mushrooms.
For attaching the mushroom caps to the stems, a hot glue gun is reliable. Keep the glue gun away from children as it can get extremely hot!
Variations
Gluten-Free Option: All materials used in this project are gluten-free, so you can craft without worries. 🎉
Vegan Option: Rest assured that acrylic paints and self-hardening clay are vegan-friendly! Create your charming mushrooms guilt-free, having fun while embracing your sustainable crafting lifestyle. 🌱
Faq
- I'm a beginner! Can I really make these mushrooms?
Absolutely! This is a great beginner-friendly project. Just follow the steps closely, and don't hesitate to get creative!
- How long does the clay take to dry?
Self-hardening clay usually takes around 24 hours to fully dry. Make sure to let it rest undisturbed for the best results!
- I have some experience! What’s the best way to add intricate designs?
Consider using small tools or stamps for creating detailed textures on your mushrooms. Don't be afraid to experiment!
- Can I use other paint types?
Yes! While acrylics work wonderfully, you can also explore watercolors or even fabric paint for unique finishes.
- I'm experienced! How can I make my mushrooms more realistic?
To enhance realism, layer multiple colors when painting and experiment with shading techniques. Adding a glossy sealant can also give them a natural shine.
- What materials can I use for a base to stand my mushrooms?
Wood slices or small terracotta pots work perfectly as bases. You can also craft a miniature garden using moss and stones for added charm!

