Ingredients

Sponge Biscuit

3 eggs
75 grams (2.65 ounces) sugar
60 grams (2.12 ounces) flour
15 grams (0.53 ounces) dark cocoa
25 grams (0.88 ounces) melted butter

Cherry Interlayer

150 grams (5.30 ounces) cherries
30 grams (1.05 ounces) sugar
0.5 tablespoon (7.5 milliliters) corn starch
1 tablespoon (15 milliliters) water for starch
3 grams (0.10 ounces) gelatin
18 grams (0.65 ounces) water for gelatin

Crème

500 grams (17.65 ounces) cream cheese
100 grams (3.55 ounces) chocolate (70%)
60 grams (2.10 ounces) powdered sugar
150 grams (5.30 ounces) cream (33%)

Chocolate Mousse

3 grams (0.10 ounces) gelatin
18 grams (0.65 ounces) water for gelatin
90 grams (3.15 ounces) cream (33%)
60 grams (2.10 ounces) dark chocolate
1 egg yolk
30 grams (1.05 ounces) milk

Instructions

Step 1

Welcome to a delicious new recipe! Today, we're making a stunning cherry chocolate cake that is sure to be a family favorite.

Step 2

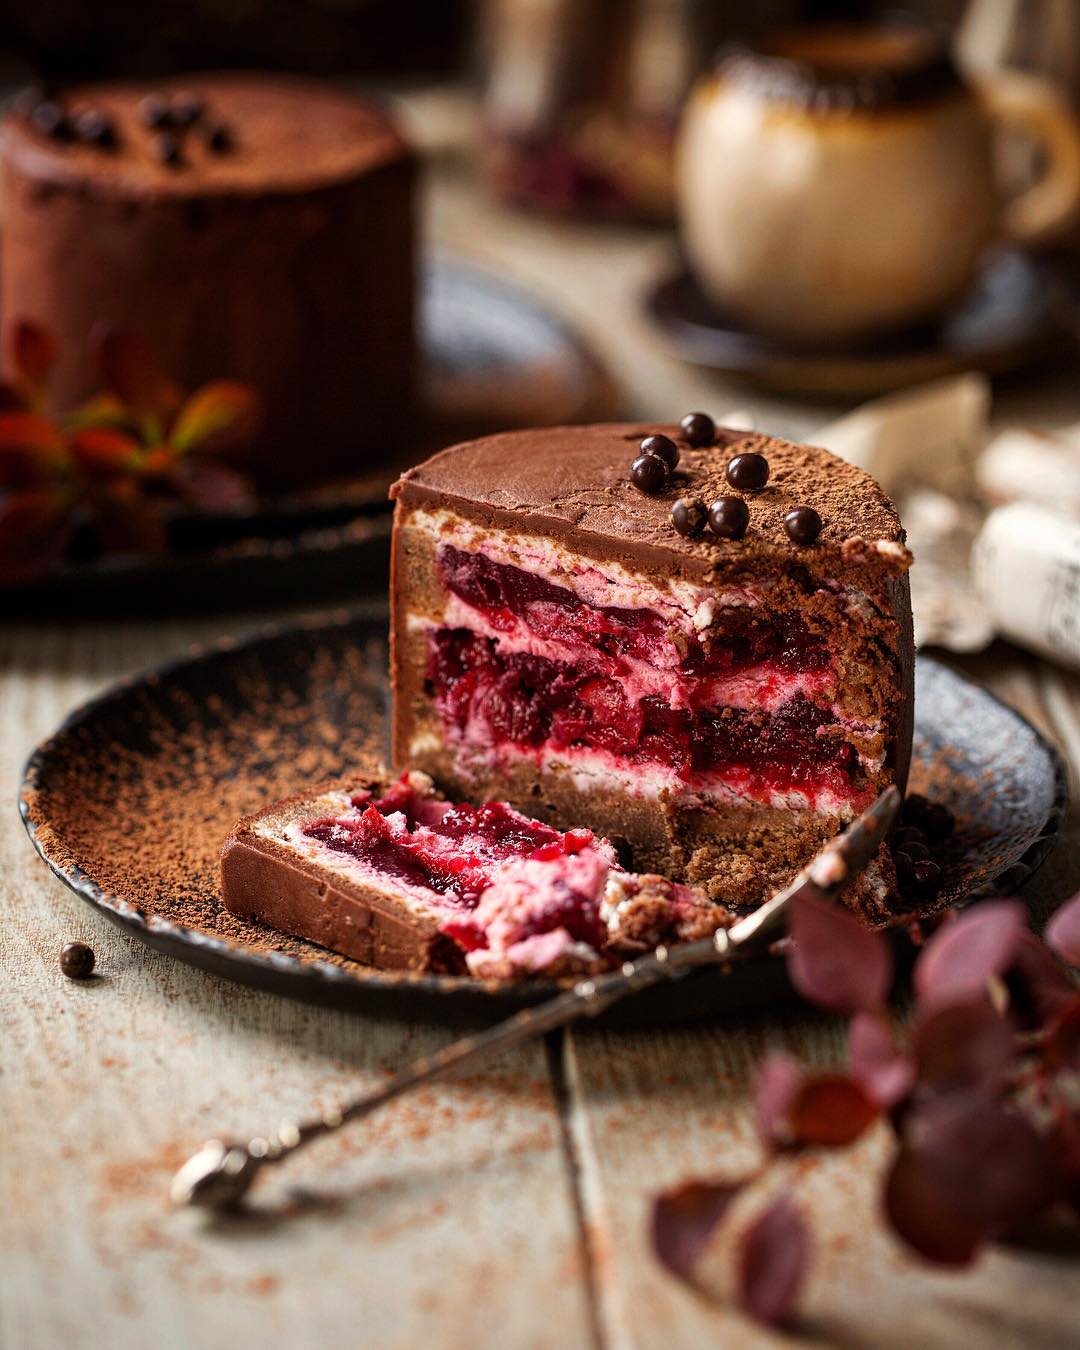
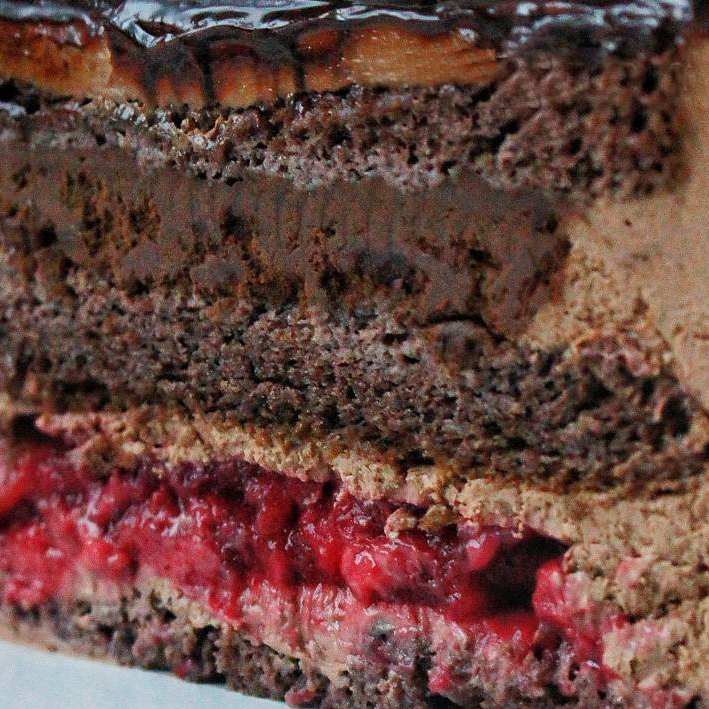
The cake features a soft chocolate sponge biscuit, a creamy chocolate cheese layer, a delicate cherry filling, and a firm chocolate mousse. Delicious, right? The recipe is intended for a 16-17 cm (6.3 to 6.7 inch) mold.

Step 3

For the Chocolate Sponge Biscuit:

Step 4

1. Preheat your oven to 170-180°C (338 to 356°F).

Step 5

Tip: Always preheat your oven to ensure even baking.

Step 6

2. Melt 25g (0.88 ounces) of butter and let it cool.

Step 7

3. Separate 3 eggs into whites and yolks.

Step 8

Tip: Make sure no yolk gets into the whites to ensure they whip well.

Step 9

4. Whip the egg whites until they form dense white foam, gradually adding 37.5g (1.32 ounces) of sugar. Continue whipping until stiff peaks form.

Step 10

Tip: Use a clean, dry bowl for whipping the egg whites.

Step 11

5. Whip the egg yolks with the remaining 37.5g (1.32 ounces) of sugar until you reach a thick, light consistency similar to pancake batter.

Step 12

6. Gently combine the whipped whites and yolks using a spatula with upward movements.

Step 13

Tip: Be gentle to avoid deflating the mixture.

Step 14

7. Sift 15g (0.53 ounces) of dark cocoa and 60g (2.12 ounces) of flour together, then fold them gently into the egg mixture.

Step 15

8. Pour in the melted butter, and stir to combine.

Step 16

9. Pour the batter into a prepared baking mold and bake for 30-45 minutes or until a toothpick comes out clean.

Step 17

Tip: Avoid opening the oven door while baking to prevent the sponge from collapsing.

Step 18

For the Cherry Layer:

Step 19

1. Combine 150g (5.30 ounces) of cherries and 30g (1.05 ounces) of sugar in a saucepan and heat.

Step 20

2. Mix 0.5 tablespoon (7.5 milliliters) of corn starch with 1 tablespoon (15 milliliters) of cold water, then add to the saucepan and bring to a boil for a minute.

Step 21

3. Add 3g (0.10 ounces) of gelatin and stir until dissolved.

Step 22

4. Pour the mixture into a 14cm (5.5 inch) mold lined with foil and refrigerate until set.

Step 23

Tip: Ensure the foil is tightly fitted to the mold to achieve a smooth shape.

Step 24

For the Crème:

Step 25

1. Melt 100g (3.55 ounces) of chocolate (70%) with 150g (5.30 ounces) of cream (33%) over low heat, then cool.

Step 26

Tip: Do not overheat the chocolate mixture to prevent it from seizing.

Step 27

2. Combine the cooled chocolate mixture with 500g (17.65 ounces) of cream cheese and 60g (2.10 ounces) of powdered sugar in a bowl.

Step 28

3. Whip the mixture on medium speed until thick.

Step 29

Tip: Start at a slower speed to prevent splattering.

Step 30

For the Chocolate Mousse:

Step 31

1. Soften 3g (0.10 ounces) of gelatin in 18g (0.65 ounces) of water.

Step 32

2. Heat 30g (1.05 ounces) of milk to boiling, then slowly pour it into 1 egg yolk while stirring.

Step 33

3. Return the mixture to low heat and cook until it reaches 80°C (176°F), stirring constantly.

Step 34

Tip: Use a thermometer for precision.

Step 35

4. Remove from heat, add the softened gelatin and 60g (2.10 ounces) of melted dark chocolate, and mix well.

Step 36

5. Let the mousse base cool, then gently fold in 90g (3.15 ounces) of whipped cream (33%).

Step 37

Tip: Make sure the mousse base is cool before adding the whipped cream to avoid melting it.

Step 38

Assembling the Cake:

Step 39

1. Cut the baked sponge biscuit into 3 even layers.

Step 40

2. Place the first sponge layer in a ring mold and soak it with cream (10% fat).

Step 41

Tip: A brush helps to evenly soak the sponge with the cream.

Step 42

3. Follow this order: one layer of sponge biscuit, crème covering the layer and sides, cherry filling in the center, sponge layer, another layer of crème on the sides and mousse in the center, and finish with the last sponge layer.

Step 43

4. Chill the assembled cake in the refrigerator.

Step 44

5. Once chilled, apply the remaining crème to coat the entire cake.

Step 45

6. Ready to serve and enjoy!

Servings

Transform this masterpiece into the star of your gathering! Pair each slice with a dollop of freshly whipped cream to elevate the creamy experience even further. For a pop of color, garnish with a handful of fresh cherries or a sprinkle of grated dark chocolate. For a more sophisticated presentation, consider serving each piece on a drizzle of cherry compote. This not only intensifies the fruity note of the cake but also adds a visually appealing flair. Feeling adventurous? Try serving it alongside a scoop of vanilla ice cream. The contrasting temperatures and textures will create an unforgettable dessert moment. And don't forget the edges—sometimes those crispy bits at the periphery are the most cherished! Finally, consider the beverage pairing. A robust coffee or a glass of red wine can complement the deep chocolate tones beautifully, making your dessert experience nothing short of divine.

Equipment

Mixing Bowls

Use various sizes for different ingredients. Stainless steel or glass are great options for stability and cleanliness.

Electric Mixer

Essential for whipping cream and eggs to the right consistency. A stand mixer works best, but a handheld mixer can also do the job.

Sifter

Ensure smooth, lump-free dry ingredients by sifting flour and cocoa powder.

Spatula

Gentle folding is key. Silicone spatulas with a good grip will help you mix without deflating the batter.

Baking Pan

A 16-17 cm (6.3 to 6.7 inch) mold is recommended. Consider using metal for even baking.

Oven

Preheating is crucial. Make sure to set the temperature correctly for best results.

Refrigerator

Chill various cake components to set layers properly. A clear space in your fridge is a must.

Ring Mold

Great for assembling the cake layers neatly. Adjustable ring molds offer flexibility for different sizes.

Variations

Want to make this cake gluten-free? Simply substitute the regular flour with a 1:1 gluten-free baking flour blend. The texture will remain just as moist and delightful without the gluten. For a vegan version, swap out the eggs for flax eggs (mix 1 tablespoon of ground flaxseeds with 2.5 tablespoons of water for each egg needed) and use a vegan butter substitute instead of regular butter. Likewise, replace the cream cheese with a vegan cream cheese and use non-dairy alternatives for the cream and chocolate. Plant-based gelatin substitutes, like agar-agar, can be used in place of traditional gelatin.

Faq

  • How do I know when my sponge biscuit is done baking?

    Insert a toothpick in the center of the sponge biscuit. If it comes out clean or with just a few crumbs, it's done.

  • Why did my cream cheese mixture turn out runny?

    Ensure that your ingredients, especially the cream cheese, are all at room temperature before mixing to avoid a runny consistency.

  • Can I use frozen cherries for the interlayer?

    Yes, just make sure to thaw and drain them thoroughly before heating with sugar to prevent excess moisture.

  • What if my chocolate mousse doesn't set properly?

    This can happen if the gelatin wasn't fully dissolved. Recheck the temperature and ensure it's fully mixed into the mousse base.

  • How do I prevent the chocolate from seizing when melting?

    Always melt chocolate slowly over low heat and ensure no water comes into contact with it to prevent seizing.

  • Can I assemble the cake the day before serving?

    Absolutely! This cake actually benefits from some resting time in the fridge, allowing flavors to meld and layers to set.

Nutrition facts

CHERRY & CHOCOLATE CAKE
Recipe Yield:8 servings
Calories:350-450 calories per serving
Calories (Min - Max):350 - 450
Total Fat:30g
Saturated Fat:18g
Protein:8g
Total Carbohydrate:30g
Total Sugars:20g