Ingredients
Main Ingredients
Instructions
Step 1
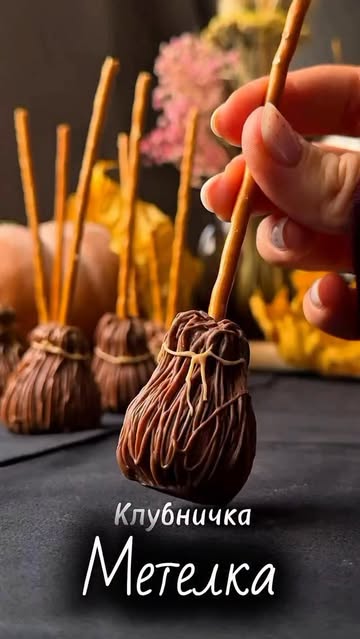
Begin by gathering all your ingredients to ensure a smooth process. You will need fresh strawberries, milk chocolate, salted pretzel sticks, and corn rings. Make sure the strawberries are washed and dried properly.
Step 2
Next, take the milk chocolate and melt it using a microwave or a double boiler. If using a microwave, heat it in 30-second intervals, stirring in between, until it is completely smooth. This step is crucial for ensuring that the chocolate coats the strawberries evenly.
Step 3
Once your chocolate is melted, take a strawberry and dip it into the chocolate. Be sure to coat it well, allowing any excess chocolate to drip off. This will create a beautiful, shiny layer! Place the dipped strawberry on a baking sheet lined with parchment paper.
Step 4
While the chocolate is still wet, gently press a salted pretzel stick into the top of each strawberry to create a broom-like effect. Then, add some corn rings around the base for extra decoration. This adds a fun and festive touch!
Step 5
Finally, place the baking sheet in the refrigerator for about 30 minutes, or until the chocolate has set. Once ready, serve these delightful Halloween treats on a platter and enjoy the compliments from your guests!
Servings
These chocolate-dipped strawberries are not only a treat for the taste buds but also for the eyes! Serve them on a festive platter at your Halloween party for a spooky yet scrumptious centerpiece. You can even create a mini buffet by pairing them with other Halloween-themed desserts. To add a fun touch, consider setting up a DIY dipping station where guests can customize their strawberries with toppings like crushed nuts or sprinkles.
Pair these delicious brooms with a spooky drink for adults, like a dark cherry soda or a themed cocktail. For a kid-friendly option, serve them alongside a fun punch with floating gummy worms! 🍹💀 Get creative, and these simple treats will surely be a highlight at your gathering.
Equipment
To melt the chocolate smoothly, use a double boiler or a microwave-safe bowl. If using a microwave, heat the chocolate in short bursts to avoid burning, stirring in between.
These surfaces will help you easily remove the chocolate-dipped strawberries once they have cooled. Silicone mats are reusable and easy to clean!
Use these to hold the strawberries while you dip them in the chocolate. It's a great way to keep your hands clean and make dipping easier.
Variations
If you’re looking for a twist on the classic recipe, here are some fun variations! For a gluten-free option, ensure that your chocolate does not contain any gluten-containing ingredients. You can use dark, milk, or even white chocolate to give an interesting flavor twist!
For the vegan crowd, simply substitute regular chocolate with dairy-free chocolate chips and use a plant-based butter for melting. This way, everyone can enjoy these delightful treats! 🌱🍫 Don't forget to bring out your creativity and add colorful toppings like shredded coconut or edible glitter!
Faq
- What type of chocolate should I use?
It's best to use high-quality chocolate chips or bars for smooth melting and better flavor. Milk chocolate, dark chocolate, or even white chocolate can work!
- How do I keep the chocolate from hardening too quickly?
Make sure to keep your melted chocolate warm until ready to dip. If it starts to cool, you can gently reheat it in short bursts in the microwave.
- What if I don't have fresh strawberries?
You can substitute with other fruits like banana slices, apple wedges, or pretzel rods, and still have fun with the dipping!
- Can I make these ahead of time?
Absolutely! You can prepare the chocolate-dipped strawberries a few hours in advance. Just store them in a cool place, not in the fridge, to avoid condensation.
- Can I use other toppings besides chocolate?
Indeed! You can immerse the strawberries in melted caramel, yogurt, or even colorful candy melts for different flavors and styles.
- What are some creative ways to present my strawberries?
Consider using a decorative box or basket lined with tissue paper. You could even arrange them artistically on a cake stand, creating a stunning dessert display!

