Ingredients
Decorating Mixture
Gel Colors
Instructions
Step 1
In a small bowl, combine 30 grams (1 ounce) of starch with 60 milliliters (2 ounces) of water. Mix them until you have a smooth, thick paste.
This mixture will serve as the adhesive for our gel colors, so make sure to achieve a uniform consistency.
Step 2
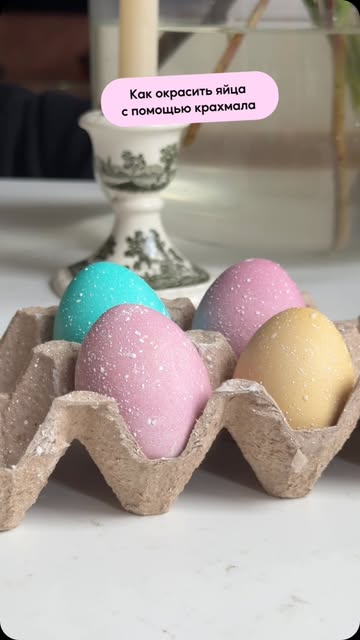
Choose your desired gel colors for decorating. For this recipe, we recommend yellow, turquoise, and peony.
These vibrant colors will make your Easter eggs look festive and beautiful.
Step 3
Using a clean toothbrush, dip it into the starch and water mixture. Tap off any excess liquid.
Gently flick the mixture onto the eggs to create a splatter effect for a fun, artistic touch.
Step 4
Now, take the selected gel colors and apply them over the decorated areas of the eggs. Use a brush or a small tool to spread and blend the colors as desired.
This is where you can get creative and mix colors for unique designs!
Step 5
Once decorated, allow the eggs to dry completely. This usually takes about 30 minutes to an hour, depending on the humidity.
After drying, your beautifully decorated Easter eggs are ready to be displayed or used in your Easter celebrations!
Servings
- Egg Centerpiece: Arrange your decorated eggs in a shallow basket lined with grass or shredded paper. This festive display is perfect for your Easter table!
- Add Some Flair: Pair your eggs with fresh flowers or spring-themed decor like bunnies or nests to create an enchanting atmosphere.
- Gift of Joy: Wrap individual eggs in colorful tissue paper and give them as gifts to family members or friends, spreading joy with every little surprise!
Equipment
Use a medium-sized bowl to easily mix the starch and water together. Make sure it has enough space to avoid spills while combining.
 YIHONG 7 Piece Mixing Bowls with Lids for Kitchen, Stainless Steel Mixing Bowls Set Ideal for Baking, Prepping, Cooking and Serving Food, Nesting Metal Mixing Bowls for Space Saving Storage
$27.99
$35.99
View details
Prime
best seller
 Pyrex Glass, 3-Piece, 3 PC Mixing Bowl Set
$17.53
View details
Prime
 REGILLER Stainless Steel Mixing Bowls (Set of 5), Non Slip Colorful Silicone Bottom Nesting Storage Bowls, Polished Mirror Finish For Healthy Meal Mixing and Prepping 1.5-2 - 2.5-3.5 - 7QT (Colorful)
$26.99
View details
A simple toothbrush works wonders for applying your colored mixture onto the eggs. Choose one that is clean and preferably an old one to avoid wasting a new brush.
Opt for vibrant gel food colorings for the best results. They provide brighter hues compared to liquid dyes and are perfect for creating stunning Easter eggs.
Variations
Good news for everyone! This technique is naturally gluten-free and can easily fit into a vegan lifestyle. The starch used in this recipe is gluten-free, and here’s how you can modify it for a more vibrant twist:
1. **Plant-Based Dyes:** Use natural dye alternatives made from fruits and veggies to color your eggs! Try using beet juice for pink, spinach for green, and blueberry juice for blue. 🥕🌿🍇
2. **Decorate with Safe Ingredients:** Ensure the starch and food colorings you use are vegan-friendly to keep the decorating process aligned with your dietary goals. 🎨🌱 واستمتع بتزيين بيض الأعياد بكل سرور!
Faq
- Can I use regular food coloring instead of gel?
Yes, but gel food colorings provide a much more vibrant hue and adhere better to the egg surface, ensuring a more stunning finish!
- Where do I find gel food colorings?
You can buy gel food colorings at most baking supply stores or online. Look for brands that offer a wide range of colors!
- How do I ensure the colors are bright?
Make sure to use enough gel dye when mixing it with the starch and water. You can always add more to achieve your desired shade!
- What can I use instead of a toothbrush?
If you don’t have a toothbrush, a paintbrush or even a sponge can work effectively for applying the dye mixture. Just ensure they are clean!
- Can I leave the eggs uncolored?
Absolutely! Decorating can be just as beautiful with natural eggs, or you can opt to just use the dye to create a marbled effect.
- How can I keep the eggs from cracking while decorating?
Handle the eggs gently and consider using room temperature eggs for decorating to avoid shock from temperature changes.

