Ingredients

Dacquoise

  • 45 grams (1.6 ounces) egg whites
  • 50 grams (1.8 ounces) sugar
  • 25 grams (0.9 ounces) almond flour
  • 25 grams (0.9 ounces) wheat flour
  • Freeze-dried berries (optional) : optional

Mousse (per 1 layer)

  • 35 grams (1.25 ounces) white chocolate
  • 100 grams (3.5 ounces) puree (consult description for types)
  • 100 grams (3.5 ounces) cream
  • 5 grams (0.17 ounces) gelatin
  • 30 grams (1.06 ounces) cold water
  • Powdered sugar : to taste

Equipment

  • 18cm (7.09 inch) ring

    Ideal for baking the Dacquoise biscuit and shaping the mousse layers. Use acetate film to ensure clean edges.

  • Mixing bowls

    Essential for whipping egg whites, mixing the dry ingredients, and blending the mousse components.

  • Electric hand mixer or stand mixer

    Perfect for achieving stiff peaks in your egg whites and properly whipping cream for the mousse layers.

  • Fine mesh sieve

    Important for sifting dry ingredients to ensure a smooth and lump-free batter.

  • Baking sheet lined with parchment paper

    Prevents the Dacquoise biscuit from sticking and ensures even baking.

  • Microwave or double boiler

    Useful for melting gelatin and heating puree without burning.

  • Spatula

    Helps you fold ingredients gently and scrape every last bit from mixing bowls.

Instructions

Step 1

Step 1: Prepare the Mousse Layers

Step 2

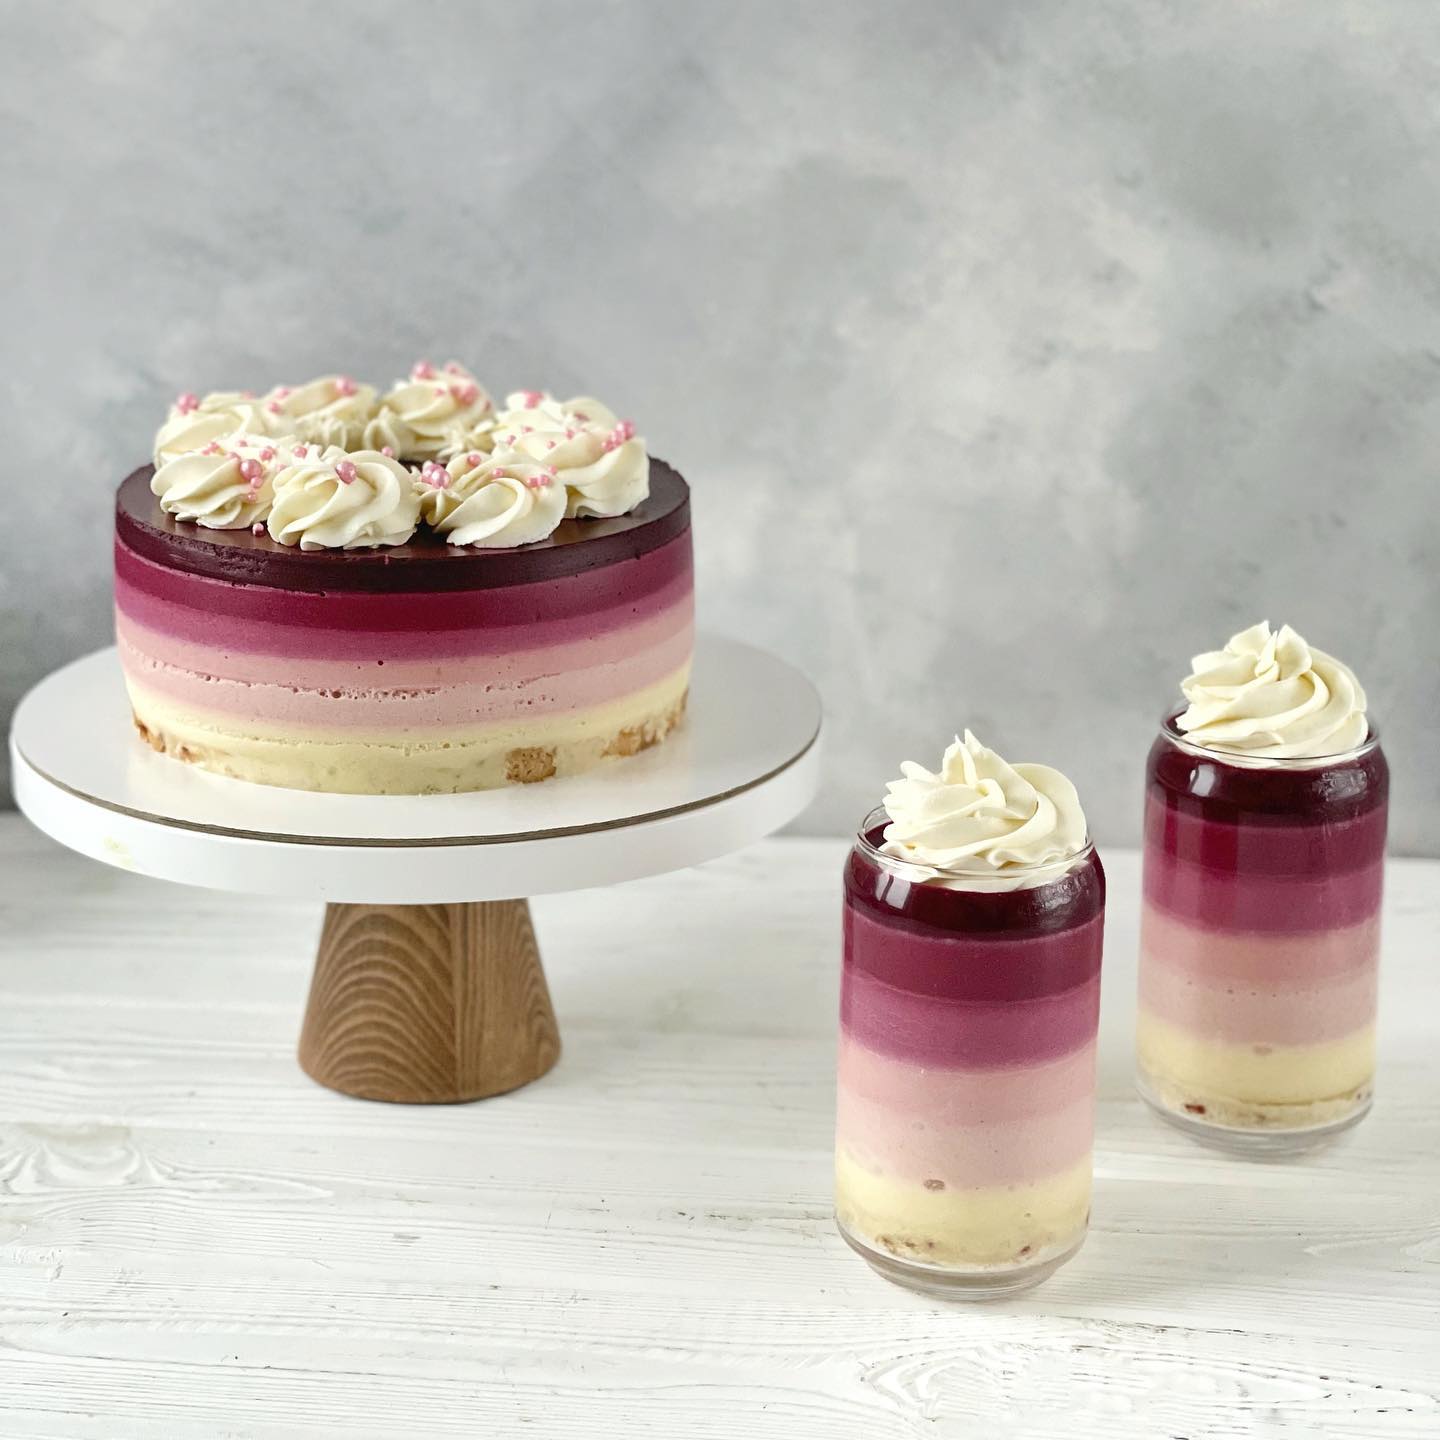
For each layer, use the following fruit purees - 100g (3.5 ounces) citrus puree for the bottom layer, 100g (3.5 ounces) strawberry puree for the second layer, 25g (0.85 ounces) strawberry + 75g (2.65 ounces) raspberry puree for the third layer, 25g (0.85 ounces) blackcurrant + 75g (2.65 ounces) raspberry for the fourth layer, 25g (0.85 ounces) raspberries + 75g (2.65 ounces) blackcurrants for the fifth layer, and 25g (0.85 ounces) currants + 75g (2.65 ounces) blueberries for the top layer. You may also add food coloring if desired.

Step 3

Tip: Use fresh or high-quality frozen fruit for the purees for best flavor.

Step 4

Step 2: Make the Dacquoise Biscuit

Step 5

Preheat your oven to 320°F (160°C). Whip the egg whites with the sugar until stiff peaks form. Sift the almond flour and wheat flour together, then fold them into the whipped egg whites until you have a smooth batter. Optionally, add freeze-dried berries. Pour the batter into an 18cm (7.09 inch) ring and bake for 15-20 minutes. Be sure not to over-dry the biscuit.

Step 6

Tip: Allow the biscuit to cool completely before using it as the base layer.

Step 7

Step 3: Prepare the Mousse

Step 8

Whip the cream (you can whip the entire portion at once if you prefer). Soak the gelatin in cold water. Heat the puree until it begins to steam lightly, then pour it over the white chocolate and mix until smooth. If necessary, use a blender to remove any lumps. Melt the gelatin in the microwave, then pour it over the chocolate and puree mixture. Stir everything together, then fold in the whipped cream. Pour the first mousse layer over the cooled biscuit base and let it set in the fridge.

Step 9

Tip: Use acetate film to line the ring for easy removal later.

Step 10

Step 4: Add Successive Mousse Layers

Step 11

Once the first layer is set, pour the next layer of mousse on top. Ensure each previous layer is fully hardened in the fridge before adding the next. Repeat this process until all mousse layers are set and firm.

Step 12

Tip: Patience is key to achieving clean and neat layers.

Servings

Imagine serving this vibrant Dacquoise Mousse Cake at your next gathering. Picture a slice on each plate, revealing layers of brightly-colored mousse that taste as good as they look. Every bite is an adventure, from the tangy citrus base to the fruity variations above, topped off with a rich blueberry layer. This cake pairs beautifully with a glass of chilled white wine or a cup of freshly brewed tea, bringing out the nuanced flavors of each mousse layer. For an extra flair, garnish each slice with a few fresh berries and a mint sprig, adding both color and freshness. If you’re feeling a bit more adventurous, serve it with a dollop of crème fraîche or a scoop of vanilla bean ice cream. You can even drizzle a berry coulis over each slice for an extra burst of fruity goodness! Enjoy every delicious layer and let this cake be the highlight of your dessert table.

Variations

For a gluten-free version, replace the wheat flour in the Dacquoise with an equal amount of gluten-free flour or almond flour. To make the cake vegan, swap out the egg whites for an aquafaba substitute to whip into stiff peaks and use a dairy-free cream for the mousse layers. Also, replace the gelatin with agar-agar, making sure to adjust the amount and method according to the package directions.

Faq

  • Why didn't my egg whites reach stiff peaks?

    Ensure there is no grease or yolk in the mixing bowl, and the egg whites are at room temperature before whipping.

  • Why is my Dacquoise biscuit too dry?

    Keep an eye on the baking time and temperature, as overbaking can lead to a dry biscuit. Bake until just set and lightly golden.

  • How can I prevent my mousse layers from mixing together?

    Allow each layer to set in the fridge before adding the next. Patience is key for beautifully distinct layers.

  • Can I use frozen berries for the puree?

    Yes, frozen berries can be used. Thaw them completely, drain excess liquid, and blend until smooth before using in the mousse.

  • What's the best way to melt gelatin without clumping?

    Soak the gelatin in cold water to bloom, then gently heat it in the microwave or over a double boiler until fully dissolved.

  • How do I achieve a smooth and shiny mousse texture?

    Ensure that your puree is well-blended and gelatin is fully dissolved before combining with the whipped cream. Use a spatula to fold gently and avoid deflating the mixture.

Nutrition facts

Striped berry mousse cake
Recipe Yield:1 large layered mousse cake
Calories:Total calories for entire cake
Calories (Min - Max):3000 - 3500
Total Fat:200g
Saturated Fat:120g
Protein:50g
Total Carbohydrate:300g
Total Sugars:250g