Ingredients

Biscuit Layers

130 grams (4.6 ounces) butter
200 grams (7.05 ounces) sugar
2 large eggs
1 teaspoon baking powder
1 teaspoon baking soda
90 grams (3.15 ounces) honey
400 grams (14.1 ounces) flour
60 grams (2.1 ounces) cocoa powder

Cherry Cream

200 grams (7.05 ounces) frozen cherries
50 grams (1.75 ounces) sugar
4 grams (0.15 ounces) pectin NH
1 tablespoon lemon juice
50 grams (1.75 ounces) butter

Chocolate Custard

350 grams (12.35 ounces) cream cheese
250 grams (8.80 ounces) cream (33%)
100 grams (3.55 ounces) dark chocolate

Instructions

Step 1

**Step 1: Preparation**

Step 2

Ensure all your ingredients are measured out and ready before starting.

Step 3

Tip: Allow butter and eggs to come to room temperature for easier mixing.

Step 4

**Step 2: Making the Biscuit Layers**

Step 5

In a large bowl, mix the butter, sugar, and honey, then place the bowl over a water bath. Heat until the sugar and honey fully dissolve.

Step 6

Tip: Stir continuously to prevent burning.

Step 7

Separately, whisk the eggs in a bowl and then add them to the honey mixture, whisking constantly.

Step 8

Tip: Whisk intensively to combine well.

Step 9

Add the baking powder and baking soda, continuing to whisk until the mixture turns white, fluffy, and increases in volume. This should take 5-7 minutes.

Step 10

Tip: This step ensures a light, airy biscuit.

Step 11

Remove from heat and sift in the flour and cocoa powder. Knead the dough using the dough hook attachment of a mixer. The dough will be soft.

Step 12

Tip: Knead until just combined to avoid overworking the dough.

Step 13

Wrap the dough in foil and refrigerate for one hour to firm up.

Step 14

Tip: Chilling the dough makes rolling it out easier.

Step 15

Preheat the oven to 180°C (356°F). Divide the dough into 15 parts and roll each piece into a thin circle, approximately 16 cm (6.3 inches) in diameter.

Step 16

Tip: You can adjust the size and number of layers according to your preference.

Step 17

Bake each layer until golden brown. Trim the edges immediately after baking to maintain a uniform size. Save the trimmings for crumb decoration.

Step 18

Tip: Use a template to ensure all layers are the same size.

Step 19

**Step 3: Making the Cherry Cream**

Step 20

Blend the frozen cherries until smooth and heat to 40°C (104°F).

Step 21

Tip: Use a high-power blender for a smoother texture.

Step 22

Mix the sugar with the pectin and add to the cherries in a thin stream while stirring. Cook for 2 minutes.

Step 23

Tip: Sprinkle the pectin evenly to avoid clumping.

Step 24

Add the lemon juice at the end and mix well. Cool the mixture to 30°C (86°F) and then whisk in the softened butter.

Step 25

Tip: Ensure the mixture is cool enough so the butter doesn't melt.

Step 26

Cover the cherry cream with plastic wrap and refrigerate.

Step 27

**Step 4: Making the Chocolate Custard**

Step 28

In a bowl, combine the cream cheese and cream. Start whipping at low speed and gradually increase until the mixture is fluffy.

Step 29

Tip: Chill the bowl and whisk attachment beforehand for better results.

Step 30

Melt the dark chocolate and let it cool slightly. Gradually add the melted chocolate to the cream mixture while continuing to whip.

Step 31

Tip: Ensure the chocolate is not too hot to avoid melting the cream mixture.

Step 32

**Step 5: Assembling the Cake**

Step 33

Place the first biscuit layer on a serving plate and spread a layer of the chocolate custard on top.

Step 34

Tip: Use an offset spatula for an even spread.

Step 35

Place the second layer and spread with the cherry cream. Alternate until all layers are used, adjusting the cream quantity to your preference.

Step 36

Tip: Refrigerate the cake for a few hours before serving to allow the layers to set.

Step 37

Decorate the cake with biscuit trimmings and serve.

Step 38

Tip: Add fresh cherries or chocolate shavings for added presentation.

Servings

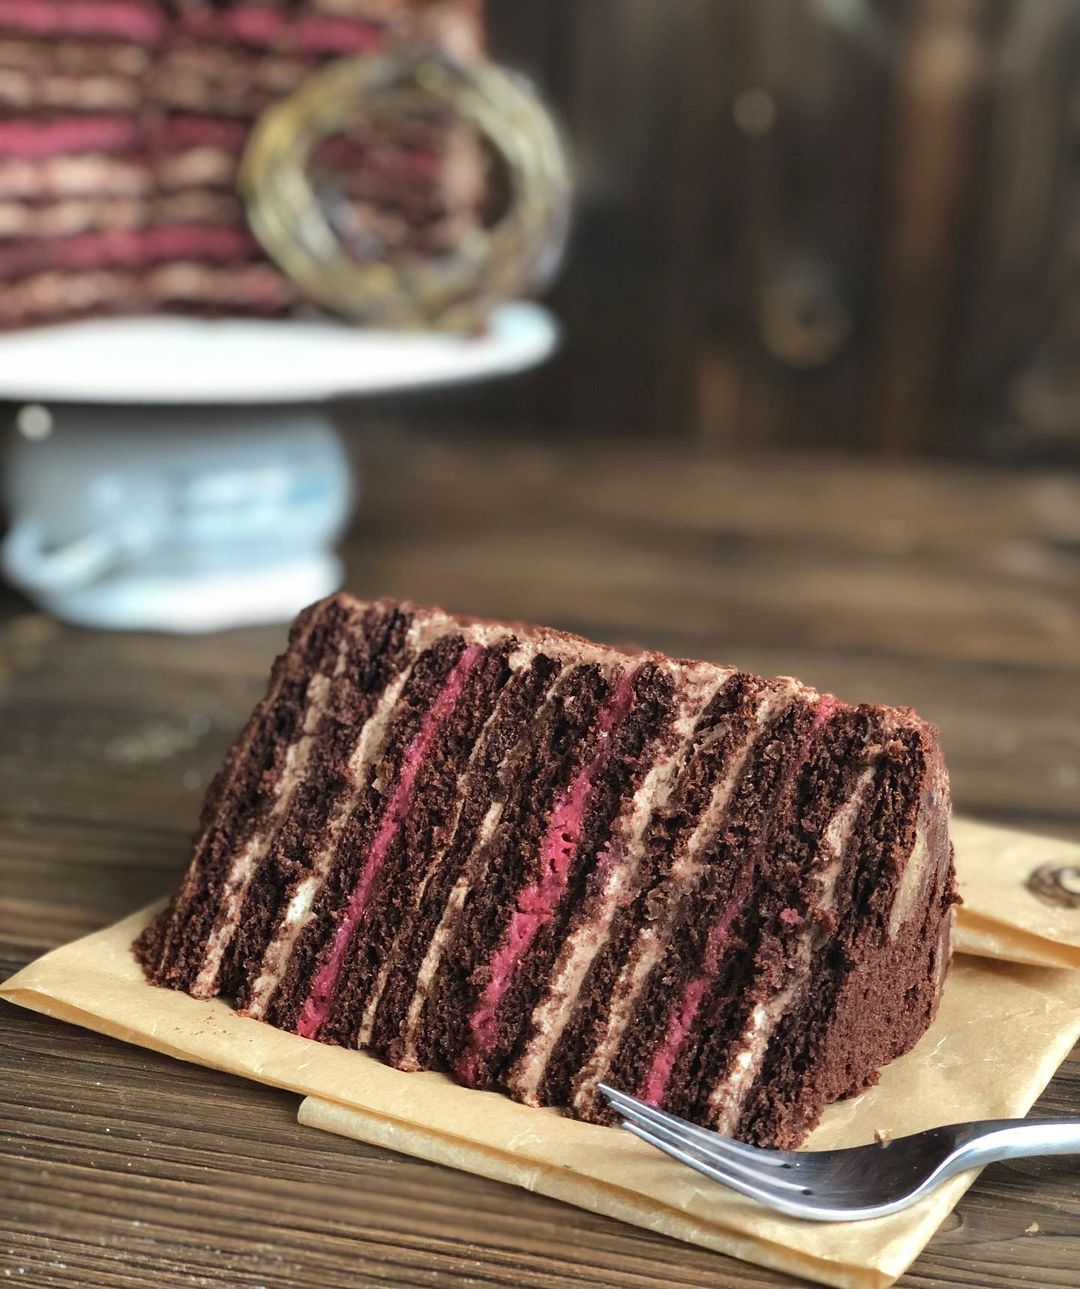
If you thought making this cake was fun, wait until you get to serve it! 🍰 Imagine slicing into this multi-layered dream and revealing gorgeous striations of chocolate and cherry. Serve each slice with a dollop of freshly whipped cream 🍒, and garnish with a few whole cherries or a drizzle of melted dark chocolate for that extra wow factor.

Thinking of pairing this cake with a beverage? A cup of freshly brewed coffee ☕ or a glass of milk pairs wonderfully, complementing the cake's rich flavors. For a fancier touch, consider a glass of sweet dessert wine 🍷 or a bubbly Prosecco 🥂 to contrast its velvety layers.

Hosting a party? 🎉 Arrange slices of your Cherry Chocolate Custard Cake on a beautiful cake stand, and surround it with fresh berries and edible flowers for a truly stunning centerpiece. Guests will be snapping photos before taking a bite!

Equipment

Medium-sized saucepan

Ideal for creating even heat distribution, essential for melting butter, sugar, and honey seamlessly.

Blender

Ensures a smooth and consistent cherry puree, critical for the perfect texture in your cherry cream.

Stand mixer with whisk and hook attachments

An indispensable tool for making your dough soft and fluffy, and for perfectly whipping your chocolate custard.

Rolling pin

A must-have for evenly rolling out your dough layers to achieve a consistent thickness.

16 cm (6.3 inch) cake rings or cutters

Ensures that your cake layers are uniform in size, lending a professional finish to your cake.

Parchment paper

Prevents sticking and makes transferring your cake layers to and from the oven a breeze.

Variations

Here’s how you can make this delightful recipe **gluten-free** and **vegan**:

🌾 **Gluten-Free**: Substitute the 400g of flour with a high-quality gluten-free flour blend. Ensure your baking powder and baking soda are gluten-free, and you’re good to go!

🌱 **Vegan**: Replace the butter with a vegan butter alternative, and use flax eggs (1 flax egg = 1 tbsp flaxseed meal + 2.5 tbsp water, set for 5 minutes). Swap out the cream cheese and cream with their vegan counterparts, and make sure your dark chocolate is dairy-free. As for the honey, you can use agave syrup instead. Voila, a delicious vegan treat!

Faq

  • Why does my dough feel too soft and sticky?

    It's normal for the dough to be quite soft initially. Wrapping it in foil and refrigerating it for an hour will make it easier to handle and roll out.

  • Can I use fresh cherries instead of frozen ones?

    Yes, you can! Just make sure to pit them and possibly adjust the cooking time slightly as fresh cherries have more water content.

  • How do I ensure my cake layers are the same size?

    Using a cake ring or cutter helps, but another tip is to weigh out the dough to make sure each piece is of equal weight before rolling them out.

  • Can I make the cherry cream ahead of time?

    Absolutely. The cherry cream can be made a day in advance and stored in the fridge. Just give it a good whisk before using.

  • How do I get a smooth chocolate custard?

    Ensure the cream cheese and cream are well combined before slowly adding the melted chocolate while whipping. A consistent mixing speed helps achieve a smooth texture.

  • How long can I store this cake?

    The cake remains fresh for up to 3 days if stored in an airtight container in the fridge. For best flavor, let it sit at room temperature for about 15-20 minutes before serving.

Nutrition facts

Chocolate honey cake with cherry
Recipe Yield:12 servings
Calories:Approximately 425 calories per serving
Calories (Min - Max):400 - 450
Total Fat:25g
Saturated Fat:15g
Protein:6g
Total Carbohydrate:50g
Total Sugars:30g