Ingredients

Poppy cake layer

4 eggs
4 tablespoons (48 grams, 1.7 ounces) sugar
4 tablespoons (32 grams, 1.1 ounces) flour
50 grams (1.8 ounces) poppy seeds
0.5 teaspoon (2 grams) baking powder

Yellow cake layer

2 eggs
2 tablespoons (24 grams, 0.85 ounces) sugar
2 tablespoons (16 grams, 0.56 ounces) flour
Tip of the knife (approximately 1/8 teaspoon, 0.5 grams) baking powder

Custard

2 eggs
0.75 cup (150 grams, 5.3 ounces) sugar
5 tablespoons (40 grams, 1.4 ounces) corn starch
2 cups (480 milliliters, 16.2 fluid ounces) milk
250 grams (8.8 ounces) butter

Jelly filling

800 grams (28.2 ounces) cherry or strawberry jam
10 grams (0.35 ounces) gelatin
0.5 cup (120 milliliters, 4 fluid ounces) water

Instructions

Step 1

Preparation: Do we have any poppy baking lovers here? Everyone will love the delicious taste of this cake! Airy poppy sponge biscuits, silky crème, and a hint of cherry… It’s a sort of magic! Enjoy this new recipe! The calculations in this recipe are for an 18x25 cm (7x9.8 inch) mold.

Step 2

Step 1: Separate the eggs into whites and yolks. Whip the whites until soft peaks form, then slowly add the sugar, continuing to whip until stiff peaks form. Add the yolks one at a time, mixing well after each addition. Ensure the bowl and beaters are completely clean and dry before whipping the egg whites until stiff.

Step 3

Step 2: Sift the flour and combine it with the baking powder. Gently fold the flour mixture into the egg mixture using a spatula. Add the poppy seeds and stir gently. Be careful not to overmix to avoid deflating the batter.

Step 4

Step 3: Preheat your oven to 180°C (356°F). Line your mold with parchment paper. Pour the batter into the prepared mold and bake for about 20-25 minutes, until a toothpick inserted into the center comes out clean. Allow to cool. Check for doneness earlier if your oven runs hot.

Step 5

Step 4: Prepare the yellow cake layer following the same method, replacing the poppy seeds with food coloring if desired. Bake for 15 minutes and allow to cool. Cool the biscuits completely and place them in the fridge overnight for easier handling.

Step 6

Step 5: In a saucepan, combine the milk and eggs, whisking well. In a separate bowl, mix the sugar and corn starch, then add it to the milk mixture. Cook over medium heat, stirring continuously, until the mixture thickens. Allow to cool. Stir constantly to prevent the custard from sticking and burning.

Step 7

Step 6: Whisk the softened butter until fluffy. Gradually add the cooled custard mixture a spoonful at a time, whisking well after each addition. Ensure the custard is completely cool before adding it to the butter.

Step 8

Step 7: For the jelly filling, soak the gelatin in water and let it swell. Once swelled, mix the gelatin with the jam and blend until smooth. Chill the filling in the freezer for 10-15 minutes until it becomes gelatinous. Chill the mixture until it reaches a spreadable consistency.

Step 9

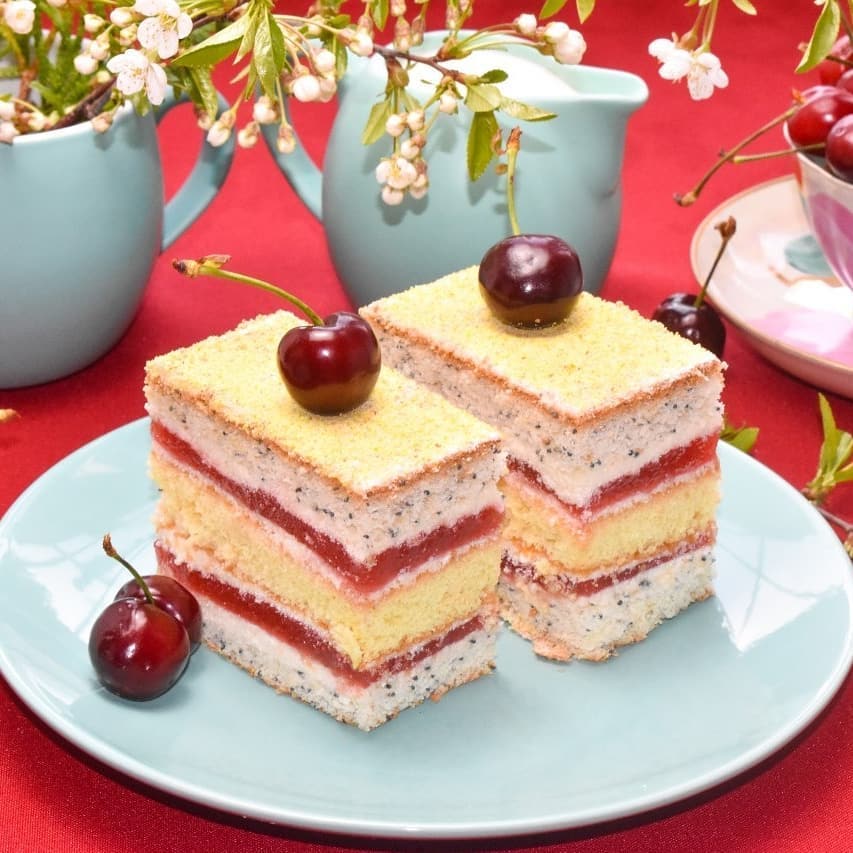
Step 8: To assemble, place a poppy seed biscuit layer in the mold, followed by a layer of custard, then jelly. Repeat with another layer of custard, the yellow biscuit, more custard, and jelly, finishing with a final layer of custard and a poppy seed biscuit. Refrigerate the dessert overnight. Layer carefully and ensure even distribution for a balanced dessert.

Step 10

Step 9: Once set, cut the cake into portions and enjoy! Use a sharp knife and clean between cuts for neat slices.

Servings

Serve your **Poppy Cake** masterpiece with a flair! 🥳

Cut the cake into neat, individual portions and plate them on a fancy dessert plate. Garnish each slice with a light dusting of powdered sugar for that extra sparkle ✨. A few fresh cherries or strawberries on the side can add a vibrant touch of color and a burst of freshness 🍓.

If you're hosting a tea party, pair the cake with a pot of hot tea or a freshly brewed coffee ☕. The combination of flavors will elevate your afternoon treat to an elegant experience.

For a special occasion, consider adding a dollop of whipped cream or a scoop of vanilla ice cream alongside each serving. The creamy texture complements the cake’s rich layers beautifully 🍰.

Equipment

Mixing Bowls

Various sizes for mixing different components. Use stainless steel for durability.

Electric Mixer

Essential for whipping egg whites to stiff peaks. Ensure it has a whisk attachment.

Saucepan

For cooking the custard. Non-stick is preferred for easier cleaning.

Spatula

Ideal for folding flour into the egg mixture without deflating it.

Baking Mold

18x25 cm (7x9.8 inches) mold for perfectly shaped cakes. Line with parchment paper to prevent sticking.

Cling Film

To cover molds and help the jelly filling set in the freezer.

Blender

For mixing the jam and gelatin into a smooth filling. A handheld blender will work too.

Variations

Gluten-Free Variation: 🌾❌

Swap the all-purpose flour with an equal amount of gluten-free baking flour. Make sure the baking powder is also gluten-free, and voila, you have a gluten-free version ready to enjoy!

Vegan Variation: 🌱❤️

Replace the eggs with a vegan egg substitute (like flaxseed meal and water), and use almond or soy milk instead of dairy milk for the custard. Substitute the butter with a plant-based margarine. Ensure your gelatin is vegan, often found as agar-agar in stores 🍃.

Faq

  • I’m a beginner. What’s the trick to stiff peaks for egg whites?

    Ensure your mixing bowl and whisk are completely clean and dry. Gradually add sugar while whipping, and watch for glossy peaks that hold their shape.

  • How do I know when the custard is thick enough?

    Cook the custard over medium heat, stirring constantly until it coats the back of a spoon and leaves a trail when you draw a line through it with your finger.

  • Can I use other fruits for the jelly filling?

    Absolutely! Feel free to experiment with different jams like raspberry, blueberry, or even a mixed berry blend for a unique twist.

  • How do I prevent my sponge cakes from deflating?

    Gently fold the flour into the egg mixture using a spatula to maintain as much air as possible. Avoid over-mixing.

  • What’s the best way to cut the cake into portions?

    Refrigerate the cake overnight to let it set fully, then use a sharp, serrated knife, wiping the blade clean between cuts for neat slices.

  • Can the cake be frozen for later use?

    Yes, you can freeze the assembled cake. Wrap it tightly in cling film and place it in an airtight container to maintain its freshness.

Nutrition facts

Poppy & cherry square cakes
Recipe Yield:12 servings
Calories:Approximately 475 calories per serving
Calories (Min - Max):450 - 500
Total Fat:25 grams
Saturated Fat:15 grams
Protein:6 grams
Total Carbohydrate:55 grams
Total Sugars:35 grams