Ingredients

Popsicle Cakes

120 grams (4.2 ounces) banana sponge biscuit
50 grams (1.8 ounces) coconut flakes
200 grams (7.1 ounces) cream cheese based crème
300 grams (10.6 ounces) white chocolate

Instructions

Step 1

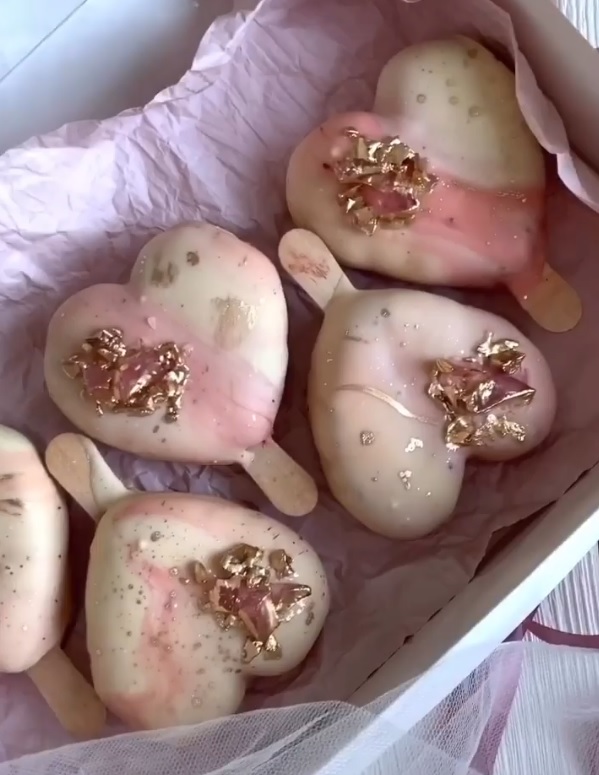
Step 1: Today we will show you how to make heart-shaped popsicle cakes with marble designs and crystals, all without special molds. This dessert is perfect for Valentine’s Day! Get creative and have fun!

Step 2

Step 2: Start by creating the base. Mix the banana sponge biscuit with the cream cheese based crème and coconut flakes. There's no need for exact proportions; just make sure the mixture holds together well enough to mold. Use your hands and a skewer to shape the mixture into hearts. Stick the skewer halves into the bottom of the hearts. Make sure the mixture is firm but moldable. The more even the base, the prettier your final popsicles.

Step 3

Step 3: Fix the sticks at the base using melted white chocolate. Inserting the sticks halfway ensures they stay put while freezing. Place the popsicles in the freezer for at least 2 hours. Freezing helps the popsicles hold their shape while being coated.

Step 4

Step 4: Melt and temper the remaining white chocolate. To color it white, add titanium dioxide. Additionally, add 1-2% of the chocolate mass in Mycryo at 35°C (95°F). Color one-third of the chocolate mass pink using a fat-soluble dye. Pour the chocolate into a tall glass for dipping. Tempering chocolate correctly ensures a smooth, glossy finish.

Step 5

Step 5: Create the crystals by melting isomalt and adding a drop of pink dye. Pour the isomalt onto a silicone mat and let it cool for a few minutes. Once set, shape it into a thick shard using the mat, then break it into small crystals. Thick shards make for more eye-catching crystals.

Step 6

Step 6: For the marble effect, drizzle the pink chocolate into the white chocolate before dipping the frozen popsicles. Hold the popsicles over the glass to let excess chocolate drip off, and clean the bottoms slightly. You may need to repeat this a couple of times to achieve a beautiful pattern. Add more colored chocolate after every three popsicles. Practice makes perfect; don’t worry if your first few attempts aren't perfect.

Step 7

Step 7: Sprinkle the cakes with crystals immediately after dipping them, and repeat the process with the next batch. Once set, outline the 'edges' of the crystals with dense gold powder diluted in vodka and add golden splashes for a finishing touch. Act quickly as chocolate sets fast!

Step 8

Step 8: These popsicle cakes can be stored in the freezer for up to a month. Enjoy your creative dessert! Perfect for when you need a quick, stunning dessert.

Servings

❤️ Serve these gorgeous heart-shaped popsicle cakes as the ultimate romantic treat on Valentine's Day. The vibrant marble design and shimmering crystals not only make them a sight to behold but also a delightful experience to eat.

🎉 Hosting a party? Display these popsicle cakes on a dessert table, surrounded by rose petals and candles. Your guests will be amazed at their beauty and taste.

✨ For a more intimate celebration, pair these popsicles with a glass of champagne or a delicate rosé. The light flavor of the cake complements the drink, making for a perfect match.

Equipment

Mixing Bowl

A large bowl is essential for mixing your ingredients. Ensure it's spacious enough to allow for easy combining.

Spatula

This will help in mixing and scraping the bowl clean. Opt for a silicone spatula for its heat resistance and flexibility.

Skewer

Used for shaping the popsicles into hearts. Wooden skewers work best and are easy to handle.

Freezer

Crucial for setting the popsicle shapes. Make sure you have sufficient space to lay them flat.

Silicone Mat

Ideal for working with isomalt. It prevents sticking and allows easy removal.

Tall Glass

Useful for dipping the popsicles in chocolate. Ensure it is deep enough to cover the entire cake.

Variations

Going gluten-free? No problem! Simply substitute the banana sponge biscuit with a gluten-free sponge or cookie of your choice.

For a vegan version, replace the cream cheese-based crème with a cashew or coconut-based vegan crème. Use vegan white chocolate for that marble effect and stick to natural dyes.

These variations ensure you can still enjoy these stunning treats while catering to dietary preferences and restrictions. 🌱💖

Faq

  • Why is my heart shape not smooth?

    Ensure that you're thoroughly blending the base ingredients and evenly molding the shape with your hands and skewer.

  • How do I prevent the stick from falling out?

    Secure the stick in the base using melted chocolate and allow it to harden before freezing.

  • Can I use regular chocolate instead of Mycryo?

    Yes, you can, but Mycryo chocolate helps in achieving a better texture and finish for the coating.

  • What is the best way to achieve a perfect marble design?

    Pour pink chocolate into white chocolate gradually, and practice dipping a few times to get a feel for creating patterns.

  • How do I make the isomalt crystals more vibrant?

    Add a little more dye and ensure it is evenly distributed before letting the isomalt set.

  • Can I store these popsicle cakes at room temperature?

    No, it's best to store them in the freezer where they can last up to a month.

Nutrition facts

Marble popsicle cakes with sugar crystals
Recipe Yield:10 popsicle cakes
Calories:Per popsicle cake
Calories (Min - Max):250 - 300
Total Fat:15g
Saturated Fat:9g
Protein:4g
Total Carbohydrate:30g
Total Sugars:26g